
Timeless Angular Best Practices
Posted on
Introduction
What are some of the best practices in Angular? And why should you care about them? In this blog we will discuss timeless best practices that are applicable to any Angular project.
What is a "Best Practice"
In short we can say that a Best Practice is a generally accepted solution to a problem that has organically grown over years of trial and error. This means that those practices were not invented instantly. They all started with a small guideline and evolved, to become better over time based on feedback of their adopters.
They are also clearly superior to their known alternatives and besides that, best practices are constantly being challenged. Not only by their adopters but also by other best practices and methodologies. .
A good example of such a best practice are the WCAG or Web Content Accessibility Guidelines. They represents the globally recognized accessibility best practices on the internet and are maintained by the W3C.
So what kind of best practices apply to Angular? Just to be clear; in this post we will not discuss how to organise our code or project architecture. We will not focus on which state management system to use or not even on the current actual debates, like for example signals versus observables.
Let’s talk more about some foundational basics that span across any kind of architectural setup or organisation of an Angular project, or even any web project in general:
- Staying up-to-date
- Handling security
- Creating accessible applications
Staying up-to-date
Staying up-to-date is sometimes the most easy best practice. But potentially also the hardest, as updating your project dependencies might be tricky!
For example because of 3rd party libraries that need to follow the upgrade cycles of Angular. They need to publish a new version before they can be upgraded.
And even worse; sometimes maintainers abandon libraries or they temporarily lose focus. With Angular moving so fast by publishing a new version each 6 months, breaking changes might occur every year. This requires maintainers to keep focus and follow the Angular releases.
Avoiding too much 3rd party dependencies
In general I recommend to avoid third party libraries for Angular as much as possible. Well, not all of them obviously, you can’t code everything yourself. But especially the ones that are simple wrapper libraries around other javascript libraries.
For example ng-qrcode is a basic wrapper around the qrcode package. It does not much more than just expose a component and directive that pass through the configuration for qrcode.

Then why not just use qrcode package and wrap it yourself if needed? It will make you stay in full control of the upgrade-path of this dependency. But nothing but respect for the owner of this package, because these kind of packages can give prime examples on how to wrap 3rd party dependencies.
Knowing how and when to upgrade
The general advice as a best practice I want to convey here is to make sure you can keep upgrading your Angular dependencies timely. And if you can’t follow immediately, because of for example a lot of 3rd party dependencies, Angular has you covered. At least if you are using a LTS version.
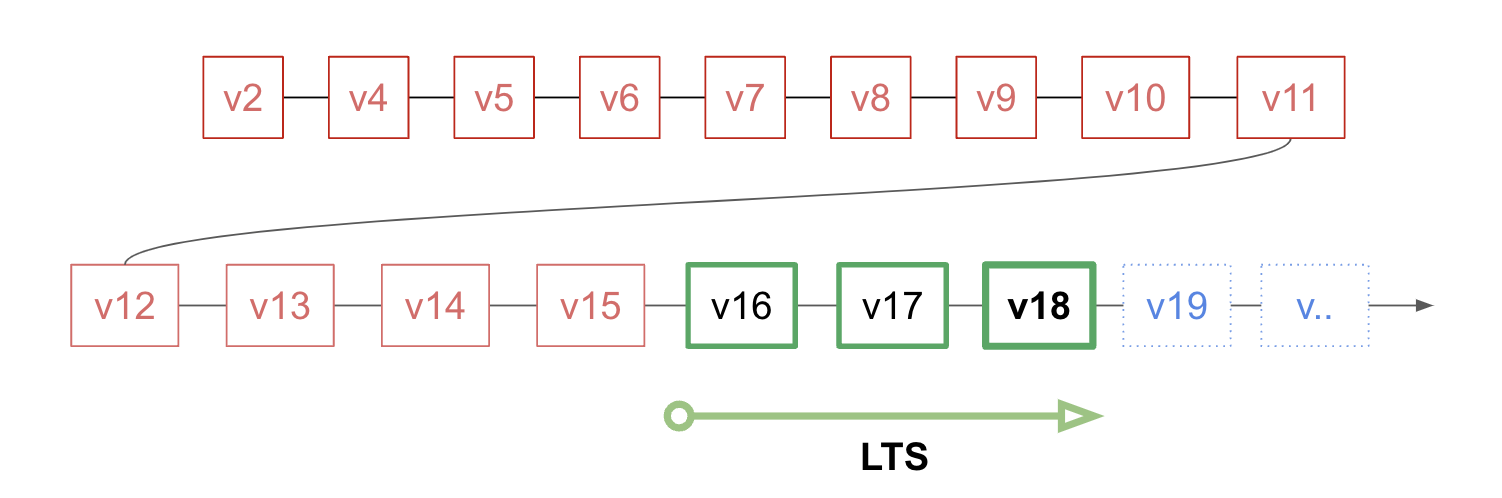
Important security release will be patched on each of those major versions that are in LTS. Currently that is v16 to v18, so be aware that v15 got kicked out of LTS only recently. That gives you, and the maintainers of the other 3rd party libraries that you use, about 1 - 1.5years for making sure an upgrade is done timely.
Tools to upgrade
So how can you keep your project dependencies up-to-date? There are various ways to do that. Let’s consider the node package manager as an example. Just keep in mind that there are most probably similar tools available for yarn or pnpm.
If you want to focus on updating Angular dependencies you can use ng update through the Angular CLI. If you use Nx and you want to migrate your Nx project to the latest Nx dependencies, you can use nx migrate latest.
Upgrade Angular / NX related dependencies
# update all angular related dependencies
npx ng update

# update all nx related
# + angular dependencies
npx nx migrate latest
These 2 commands however only focus on the Angular or Nx related dependencies by default. So let’s take it a step further. If you want to list all your current dependencies and their current, wanted and latest version available you can use the npm outdated command. And if you just want to go and update your dependencies, use the npm update command.
Upgrade any/all dependencies
# list your current dependencies and their
# current / wanted / latest versions
npm outdated

# update all your dependencies
npm update ( --save-dev / --save )
Angular Update Guide
Of course we also have the Angular Update Guide available. You can use this guide to get an initial idea of the work you need to do to upgrade between 2 major versions. Each project is unique obviously, so the instructions that are given here are just to give you a head-start!
Security
As you might already know, Angular has build-in security protection against the most common vulnerabilities.
And it sure ain’t security through obscurity! Because obviously, all parts of our FE code are always visible to any visitor of the web application.
Angular does however protect us against attacks such as cross site scripting and cross site request forgery. And one of the best ways to stay secure is by keeping up-to-date with your dependencies. But we got that covered already.
Preventing Cross Site Scripting (XSS)
XSS is one of the most common attacks on the web. It happens when attackers are able to execute injected code on your applications.
Angular treats all values as untrusted by default and sanitises them when they are injected into the DOM or executed as part of your JavaScript. So if there is an attack it most probably means the developer made it possible.
If you do need to inject content such as HTML or CSS or JS directly, you can use the DomSanitizer utility class provided by Angular. Only do this if you are sure you are protected against XSS attacks through a different mechanism. For example you have checks in place to escape any content before it gets injected into your database and returned back to the browser.
Using the Dom Sanitizer
import { DomSanitizer, SafeHtml, SafeResourceUrl, SafeUrl } from '@angular/platform-browser';

@Component({
  standalone: true,
  selector: 'my-component',
  template: `<div [outerHTML]="html"></div>
<script [src]="js"></script>
<a [href]="html">SamV Website</a>`,
  })
export class AppComponent {
  url: SafeUrl;
  js: SafeResourceUrl;
  html: SafeHtml;
  readonly #domSanitizer = inject(DomSanitizer);

  constructor(){
    this.url = this.#domSanitizer.bypassSecurityTrustUrl('https://samv.pro');
    this.js = this.#domSanitizer.bypassSecurityTrustResourceUrl('https://samv.pro/code.js');
    this.html = this.#domSanitizer.bypassSecurityTrustHtml('SamV');
    /* And others like
      - bypassSecurityTrustScript
      - bypassSecurityTrustStyle
     */
  }
}
In that case you can use libraries such as DOMPurify or Sanitize HTML to do the heavy lifting of sanitising for you. Each modern framework in the backend space has a package available to handle that for you.
There are other and more detailed ways to protect yourself against these kinds of attacks, like Content Security Policy and Trusted Types.
Preventing Cross Site Request Forgery (XSRF)
There are 2 HTTP level vulnerabilities for which Angular has build-in prevention mechanisms. Cross Site Request Forgery (XSRF) and Cross Site Script Inclusion (XSSI).
In this article I will focus on XSRF as XSSI became irrelevant when Angular dropped support for non-modern browsers like Internet Explorer. The XSSI attack has been made a lot harder by modern browsers by applying the same origin policy by default.
Cross Site Request Forgery can be easily mitigated by sending a nonce from the server in a cookie to the client and back to the server on request headers. The value has to be same or the request can be ignored. This also works because of same origin policies, where other domains can’t read out this cookie. Although this is mostly a server side technique, Angular has build in support for the client side part.
Configuring XSRF in Angular
import {
    provideHttpClient,
    withNoXsrfProtection,
    withXsrfConfiguration
} from '@angular/common/http';

bootstrapApplication(AppComponent, {
  providers: [
    provideHttpClient(
      // setup with custom cookie/header name
      withXsrfConfiguration({
        cookieName: 'MY-XSRF-TOKEN',
        headerName: 'X-MY-XSRF-TOKEN',
      }),
      // OR; to complete disable it
      withNoXsrfProtection()
    ),
  ]
})
Just use the withXsrfConfiguration function call to configure the HTTP client during bootstrap of your application. You can provide your own cookie and header names if you wish to override the default names.
Google's Bug Hunting Community
And if you do find a security bug that is related to the framework directly, you might get yourself a nice bonus. Because Angular is part of the Google Open Source Software Vulnerability Reward. So if you believe to have found a major issue, be sure to report it!
Accessibility - a11y
There is a lot to be said about accessibility on the web. And obviously, for Angular this is not much different. But there are specific things to consider when improving the accessibility of your Angular applications.
Apply aria attributes
The first thing you can do is elevate your applications with aria attributes. I am not going to go over the entire specification of ARIA and its potential. But I will give you a few examples.
aria-live example in Angular
<div class="toasts-wrapper" aria-live="polite">
  @for (let toast of toasts) {
    <my-toast [config]="toast" />
  }
</div>
aria-live is an attribute you can use to indicate to screen readers that whatever is in this block is likely to change over time or because of user interaction. Whenever the user is idle it will speak out the changes that occurred in that block. In the example above the toasts wrapper contains a list of toasts that might change because of user interaction.
Another perhaps more well known example is aria-label. In the second code example below, the button has no textual content, but an SVG representing a cross to indicate that this button is used to close something. A screen reader can’t interpret the SVG so the aria-label indicates its meaning in full text.
aria-label and aria-hidden example in Angular
<button aria-label="Close">
  <svg
    aria-hidden="true"
    focusable="false">
    <path ... />
  </svg>
</button>
In Angular it’s important to use the [attr.] prefix whenever you want to bind dynamic values to aria attributes. Obviously you only need to use this [attr.] prefix if you have dynamic values. In all other cases you can just use the aria-label attribute without the prefix.
dynamic binding of aria attributes
<form>
  <input type="email" required [(ngModel)]="email"
       [attr.aria-describedby]="currentError ? ('email-' + currentError) : null" />
  <div aria-live="polite">
    <div id="email-required" class="error" *ngIf="currentError === 'required'">
      Email is required
    </div>
    <div id="email-invalid" class="error" *ngIf="currentError === 'invalid'">
      Email is invalid
    </div>
  </div>
</form>
Use the live announcer
If you want more control beyond HTML markup in your application code to announce updates, you can also use the LiveAnnouncer provided by the Angular CDK. The Live announcer uses similar techniques as with the aria-live attribute but will handle that magic for you underneath. You only need to call its API to make sure the screen reader reads your messages out loud.
angular cdk live announcer
import { LiveAnnouncer } from '@angular/cdk/a11y';

@Component({...})
export class FormComponent {
  #liveAnnouncer = inject(LiveAnnouncer);

  public validateForm(): void {
    if (formInvalid) {
      this.liveAnnouncer.announce(
        "The form was validated with the following errors:..."
      );
    }
  }
}
Augmenting native elements
Another very important implementation error that I have seen multiple times in consulting on projects is that developers are trying to reinvent the wheel. And it mostly resolves around buttons.
The general advice and best practice is to avoid creating your own elements if the native elements are already handling a lot of the hard accessibility work for you in the browser. If you wish to improve native elements or augment their behavior, use directives instead of your own components.
If you would like to augment the behavior of a button, for example to react on tripple clicks and some custom style variants, augment the button with a directive, instead of creating a custom component that tries to mimic the full behavior of a native HTML button.
❌ bad example
<my-button [disabled]="disabled"
  label="Click here"
  variant="info"
  aria-role="button"
  type="button">
</my-button>
✅ good example
<button [disabled]="disabled"
  myButton
  variant="info"
  type="button">
   Click here
</button>
Good examples of this best practice can be found in the @angular/material project. Go checkout the implementation of the material button or table components to find out how the Angular team does it.
Identify active links
Another hidden gem in the Angular router package is the ariaCurrentWhenActive directive. Although it’s clearly documented I have not seen much usage of it before.
current page indicators
<nav>
  <a routerLink="home"
     routerLinkActive="active-page"
     ariaCurrentWhenActive="page">
    Home
  </a>
  <a routerLink="about"
     routerLinkActive="active-page"
     ariaCurrentWhenActive="page">
    About
  </a>
  ...
</nav>
In the example above I have used it to indicate that the navigation links are representing the current page when they are active. In the other example, below, we can indicate which step is currently active when going through a step by step process.
current step indicators
<nav class="step-nav">
  <a routerLink="step/1"
	 class="step-nav__step"
     routerLinkActive="step-nav__step--active"
     ariaCurrentWhenActive="step">
    Step 1
  </a>
  <a routerLink="step/2"
	 class="step-nav__step"
     routerLinkActive="step-nav__step--active"
     ariaCurrentWhenActive="step">
    Step 2
  </a>
  ...
</nav>
Tracking & controlling focus
The next tip is about focussing on navigation. As a developer you should decide where focus goes after page navigation. To achieve that, you can use the NavigationEnd event of the router to reclaim or update focus.
current step indicators
inject(Router).events.pipe(
  filter(e => e instanceof NavigationEnd)
).subscribe(() => {
  const content = document.querySelector('.content');
  if (content) {
    content.focus();
  }
});
The goal of this technique is to avoid focus on the first element of the body again and to make sure your loaded content is usable right away.
And to stay in the context of focus, another one of my favorites is trapping the focus. With this simple cdkTrapFocus directive it’s easy to keep focus bound to the context, for example when opening a dialog or a detail flyout.
trap the focus
<div class="my-inner-dialog-content" cdkTrapFocus>
  <!-- Tab and Shift + Tab will -->
  <!-- not leave this element. -->
</div>
If you want more control, the Angular CDK also exposes directives to specifically mark the end and start of a focus region and to specify which element should receive the initial focus
more focus controls
<nav class="pagination">
  <a href="#start" cdkFocusRegionStart>Start</a>
  <a href="#previous">Previous</a>
  <a href="#current" cdkFocusInitial>Current</a>
  <a href="#next">Next</a>
  <a href="#end" cdkFocusRegionEnd>End</a>
</nav>
Conclusion
In this article we discussed 3 big topics of best practices in Angular, or in general applicable to any web project. The first one is to make sure you can keep upgrading your applications to follow with the LTS version of Angular. By not doing so you might miss up on important security updates.
Next to that there are some build-in framework security features like automatic sanitizing of content and protecting against the most known security threats when communicating data over the internet like XSRF and XSS.
Finally, we learned about ways to optimize our applications for all users and making them accessible for most by applying aria attributes and controlling focus where needed.
Further reading
Contents
- Introduction
- What is a "Best Practice"
- Staying up-to-date
- Avoiding too much 3rd party dependencies
- Knowing how and when to upgrade
- Tools to upgrade
- Angular Update Guide
- Security
- Preventing Cross Site Scripting (XSS)
- Preventing Cross Site Request Forgery (XSRF)
- Google's Bug Hunting Community
- Accessibility - a11y
- Apply aria attributes
- Use the live announcer
- Augmenting native elements
- Identify active links
- Tracking & controlling focus
- Conclusion
- Further reading
By reading this article I hope you can find a solution for your problem. If it still seems a little bit unclear, you can hire me for helping you solve your specific problem or use case. Sometimes even just a quick code review or second opinion can make a great difference.